Hello Everyone!
There was a requirement to integrate the Smartsheet platform with Webex Teams. One of the subtasks was to initiate a post to Webex Teams when a new row added in the Smartsheet. It sounded like a trivial task, however, turned out that we spent the whole day configuring it.
Let’s start step by step.
Environment
- We are using a AWS EC2 AMI Linux instance (t2.small).
- Flask version is “0.12.2”.
- Smartsheet account.
- Postman for creating and testing webhooks.
- PutsReq for creating “a bin” for initial inspecting responses that will be coming from Smartsheet. And the most important feature that it supports https.
Smartsheet
We’ve started our journey from the official Smartsheet documentation portal on how to create webhooks - Creating a Webhook.
We are using Postman for initial development and testing.
So, as described in documentation, there are three important steps to lounch a webhook:
- Create a webhook
- Enable the webhook
- Answer to the smartsheet with the challenge string presented.
Note: to find the id of the sheet you want to create webhook for, you could use the following python script:
import smartsheet

access_token='Your smartsheet API token'
response = ss_client.Sheets.list_sheets(include_all=True)
a = response.to_dict()
And then find name and id of the sheet in question.
Let’s tackle each of them separately.
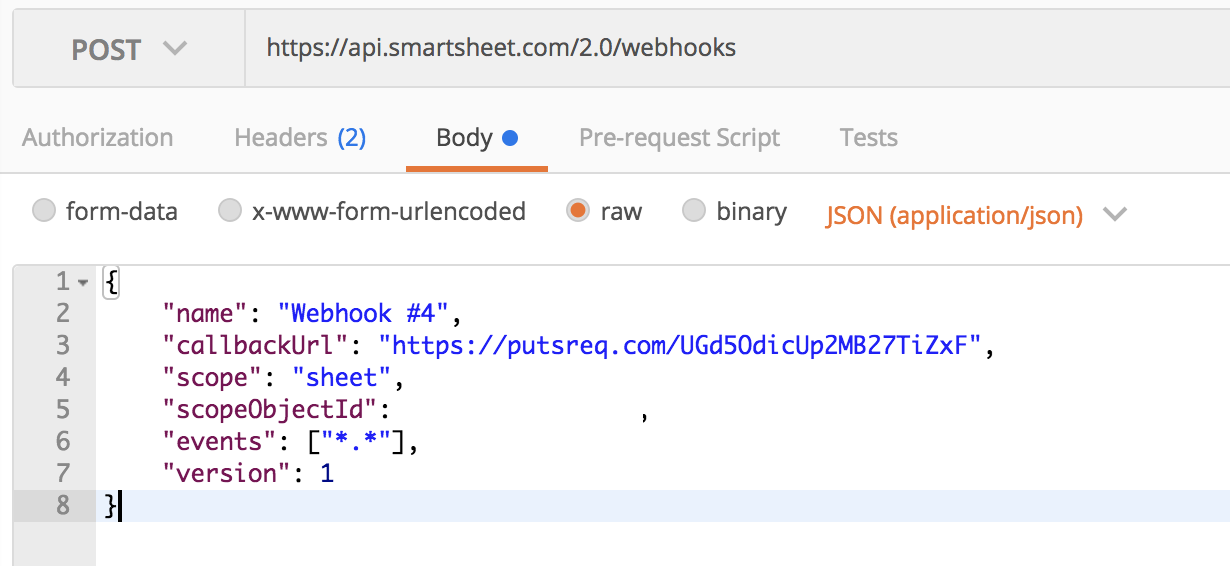
Create a webhook
On the screenshot below there is the Authorization header, which will be used in any request to Smartsheet:
 Please, insert you API token (after the Bearer word).
Note: Smartsheet supports only well-known https ports (such as 443 or 8443).
As a response, you should get something like this:
{
    "message": "SUCCESS",
    "resultCode": 0,
    "result": {
        "id": 1234567890,
        "name": "Webhook dmkravch",
        "scope": "sheet",
        "scopeObjectId": 987654321,
        "events": [
            "*.*"
        ],
        "callbackUrl": "https://ec2-11-22-33-44.compute-1.amazonaws.com:443",
        "sharedSecret": "sharedSecret",
        "enabled": false,
        "status": "NEW_NOT_VERIFIED",
        "version": 1,
        "createdAt": "2018-06-10T16:01:46Z",
        "modifiedAt": "2018-06-10T16:01:46Z"
    }
}
As you could see, the status is NEW_NOT_VERIFIED, which means that he webhook wasn’t enabled yet.
Enable the webhook 1
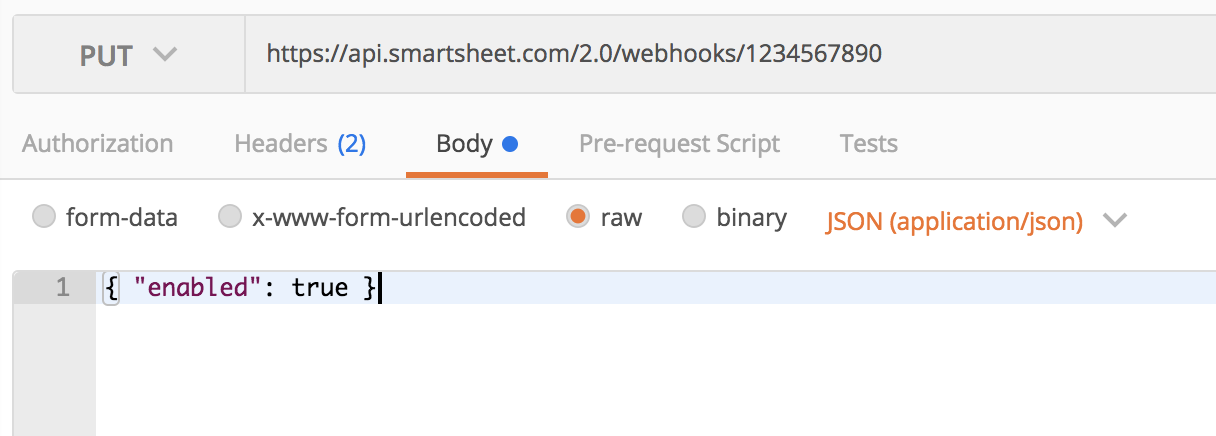
According to the documentation we need to use the PUT request and change the enabled: true.
When Smartsheet receives the request to enable the webhook, it sends a verification request to the subscriber (that is, to the callbackUrl that the API client specified in the Create Webhook request). The request specifies a unique random value in the Smartsheet-Hook-Challenge header and contains only challenge and webhookId in the request body.
The header fields remain the same, but the Body is changing:

As soon as you submit this request, the Smartsheet cloud will send the following POST request to your callbackUrl (in my fake obfuscated example it’s https://ec2-11-22-33-44.compute-1.amazonaws.com:443)

But nothing really happens, as we don’t have the backend to echo this request.
EC2 AMI instance configuration/preparations
We were researching a lot on how to secure the communication between Smartsheet cloud and EC2 instance. The reason for that, Smartsheet requires only publicly (CA) signed certificates. If you try to use self-signed certificates, you would get the DISABLED_VERIFICATION_FAILED with the description that both parties couldn’t agree on the security level. Example:
"status": "DISABLED_VERIFICATION_FAILED",
"disabledDetails": "An error occurred during SSL handshake: the client and server could not negotiate the desired level of security. (ref id: orqvg6xzjou2)",
We’ve tried both, AWS Certificate Manager and Let’sEncrypt, but they both failed to create a certificate for AWS owned DNS.
The only solution for us was to purchase a valid DNS name and create a certificate for it. The procedure is the following.
- Use Amazon Route 53 to purchase a domain.
- In the Hosted Zone configuration create an A pointer to your EC2 instance.
- Use the Let’sEncrypt free service to create a public certificate. We were using Deploying Let’s Encrypt on an Amazon Linux AMI EC2 Instance post as a reference.
- And don’t forget to open the port 443 in AWS Web interface for your EC2 instance.
Flask/Script configuration
One of the requirements for webhook to be enabled, is that the application echoes the Smartsheet-Hook-Challenge as Smartsheet-Hook-Response. Example of the code and how it could be accomplished, could be found below:
import json, requests
from flask import Flask, request
import logging

logging.basicConfig(filename='LogFile.log', level=logging.DEBUG, format='%(asctime)s %(message)s')

app = Flask(__name__)

@app.route("/", methods=['POST'])
def handle_message():
    data = request.get_json()
    logging.debug(data)
    try:
        challenge=data['challenge']
        #The line below is actually generates a 200 OK response with the smartsheetHookResponse
        return json.dumps({'smartsheetHookResponse':challenge}), 200, {'ContentType':'application/json'}
    except Exception as inst:
        logging.debug(inst)
    else:
        logging.debug("ok")
        return "ok"

app.run(host='ec2-11-22-33-44.compute-1.amazonaws.com',port=443,
#those are the certificates generated by the Let'sEncrypt service
        ssl_context=('/etc/letsencrypt/live/lets-collaborate.net/fullchain.pem', '/etc/letsencrypt/live/lets-collaborate.net/privkey.pem'))
Tutorial on how to run Flak with HTTPS is Running Your Flask Application Over HTTPS
And finaly, we need to run our python script to enable Flask to receive requests:
python your-script.py
Enable the webhook 2
Now, when you try to enable your webhook, it should return something like this, with the ENABLED status:
{
    "message": "SUCCESS",
    "resultCode": 0,
    "result": {
        "id": 1234567890,
        "name": "Webhook dmkravch",
        "scope": "sheet",
        "scopeObjectId": 987654321,
        "events": [
            "*.*"
        ],
        "callbackUrl": "https://your-purchased-domain:443",
        "sharedSecret": "sharedSecret",
        "enabled": true,
        "status": "ENABLED",
        "version": 1,
        "createdAt": "2018-06-10T18:15:11Z",
        "modifiedAt": "2018-06-10T18:49:13Z"
    }
}
Checking the output from the Smartsheet
Now in the LogFile.log you should see whenever anyone make any change to the sheet in question. It won’t share the exact changes, but rather references on what has happened. And then, to retrieve those we need to use the Get Row API, but it’s a different story.
Summary
So, the main challenge was the enforced security by Smartsheet, which required a publicly (CA) signed certificate. We needed a custom domain, because none of the CA would sigh AWS hostname. After purchasing a DNS name and creating a certificate with the Let’sEncrypt service, the webhook creation went well.
Thank you very much and hope it will help you to save time.
